
Having the ability to develop and work locally is becoming increasingly important, especially for ops folks as current tech trends are moving more towards infrastructure as code and automation. Having a way to test code locally is an important step in ensuring that deployments, configuration changes and containers that go into production have the fewest bugs and hiccups as possible.
By using a local dev environment to mimic staging and production environments closely, you can have a higher level of confidence that code changes and configurations you are releasing and/or changing will have the intended effect in other environments. Having a local dev environment will also allow you to shake out any issues before heading to production so you don’t have to debug failing services or buggy code under pressure, in the middle of the night.
Because Mac and Windows don’t offer native support for running Docker containers, there are a few different options available for working with containers and Rancher. In this post, I will show readers a few of these different ways to set up a Rancher environment to test code locally with as little effort as possible.
By the end of this post, users should be able to spin up a Rancher development environment in around 10 minutes or less in an automated way that it is reproducible.
The Vagrant Method to Setting Up Rancher Dev Environments
Up until recently, Rancher has supported a method of using Vagrant to provision the Rancher server and clients but that project seems to have been deprecated. I believe this method may still work, however, if you do try this method you will need to play around with the Vagrant configs as it doesn’t appear to be working out of the box anymore (as of 5/23/16 at least). So, please take caution if you try using this method.
There are a few other nice little projects on Github for creating the Rancher environment using Rancher. I found the Rancher-Vagrant repo on GitHub to be the easiest and fastest way to get started; it is the method I recommend if you are just getting started. You can check this project out here. It works out of the box and does what it says, and is configurable so it can be adjusted as needed fairly easily.
To make this work you will need Vagrant. If you don’t already have it, go grab it. After you have installed Vagrant, just follow the instructions from the rancher-vagrant project.
cd rancher-vagrant
vagrant up
The out-of-box defaults worked for me, so just give Vagrant a little bit of time to create and provision the environment and that’s it as far as getting things working. The Rancher-Vagrant repo will set up everything for you based on the Vagrantfile and will register the nodes to the Rancher server, which is helpful. You can then access your Rancher server by navigating to http://192.168.33.11:8080.
One nice thing about this setup is that if you destroy or re-provision Vagrant, it will keep this static IP, making it easier to manage. With the docker-machine method, you may have to use a different IP address if you destroy and recreate your dev environment, as noted in the docker-compose section.
Another great feature of this Vagrant method is that you can define your Rancher environment via the config_sample.rb. Simply rename the file to config.rb and adjust any of the values that you need to make, like number of clients to provision, memory, labels, etc.
For example, the following configuration will use customized values to configure and create a minimal Rancher environment on your local machine.
# Box configuration details# = "rancherio/rancheros"# = '>=0.4.1'## CoreOS can also be used instead of RancherOS = "alpha"# = "current" = "https://storage.googleapis.com/%s.release.core-os.net/amd64-usr/current/coreos_production_vagrant.json" % []# Tag of the rancher/server image to run = 'latest'# IP prefix to use when assigning box ip addresses = '192.168.33'# Enable syncing of the current directory# to the /vagrant path on the guest# = false# Boxes to create in the vagrant environment = [{"name" => "rancher-server","role" => "server","memory" => "1024","labels" => [],},{"name" => "rancher-agent","count" => 1,"memory" => "512","labels" => ["type=rancher-client"]},]Once your environment has been provisioned you have a local version of Rancher running on your laptop to use as your playground. Having such a simple method for creating a Rancher environment is nice for playing around with environment settings and configuration changes, and not having to worry about breaking any production environments. Examples could be testing upgrades of the Rancher server, playing around with Rancher settings or developing container application stacks.
Become a Better DevOps Pro
When you are done testing, you can easily throw your environment away using the command until you need to create a new environment. If you like your setup, just run to pause the VMs so you can come back to them later.
Honestly, I haven’t found many issues with rancher-vagrant setup and it makes me a little bad sad that the Rancher folks moved away from Vagrant as their officially supported development method. Luckily the community is active and the rancher-vagrant project is very good. If you’re happy with Vagrant and know it well you are probably safe to use this setup for your Rancher environment.
The Docker-Machine Approach to Setting Up Rancher Dev Environments
Below I will explain the “all Docker” approach that Rancher is favoring now for dev environments.
This is the shiny new, and most importantly, officially supported Rancher method of using docker-machine. You can find more about here. This method is also easy to get an environment set up, it just bypasses Vagrant and uses the docker-machine Virtualbox driver, which is very similar, but also different.
The first step is to go grab the Docker toolbox. Instructions will vary slightly for different platforms. This will give us all of the necessary Docker tools for getting up and running, namely docker-machine, which is the component that allows us to provision VMs.
Once you have installed Docker toolbox you can provision your rancher-server using the following command:
“
Docker-compose is a little bit quirky, so after you provision the new VM you will need to run a command to connect your host machine to the newly created VM.
eval
After the Docker daemon has been configured, you should now be able to run the rancher-server container on your new VM.
docker run -d --restart=always --name=rancher-server -p 8080:8080 rancher/server
Now you should be able to access your Rancher sever by navigating to http://192.168.99.100:8080/. That address is the first address that docker-machine defaults to. If you use other docker-machine vms, you can check the various IPs with this command.
docker-machine ls
OR
docker-machine ip rancher-server
And noting the URL for rancher-server or the IP that is returned from the IP command. After your Rancher server comes up you can add a client to it fairly easily:
“
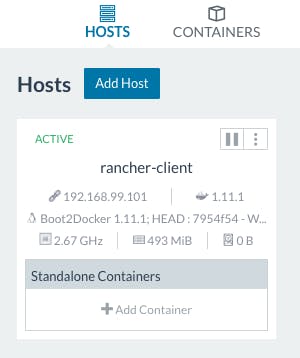
Now we have both the client and server spun up.

docker-machine ssh rancher-client
Then run the following commands:
“
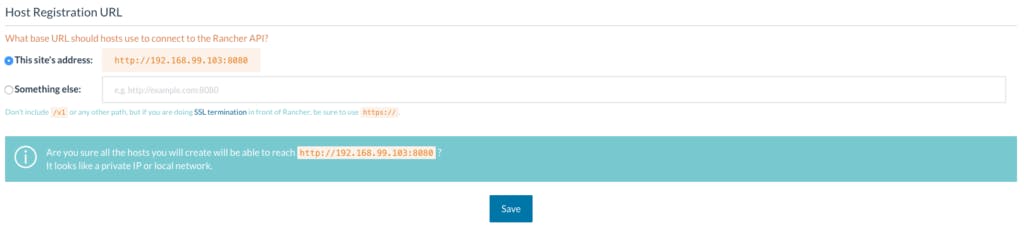
Once you have created the persistent folders for the Rancher client agent, you should be able to add the client agent container. First, you will need to click “Add host” by visiting the URL of the Rancher server posted above. Then you will need to click “save” to acknowledge the warning.
Finally, after you click “save” you should be able to provision a custom host by copy/pasting the snippet generated. Something similar to the following:
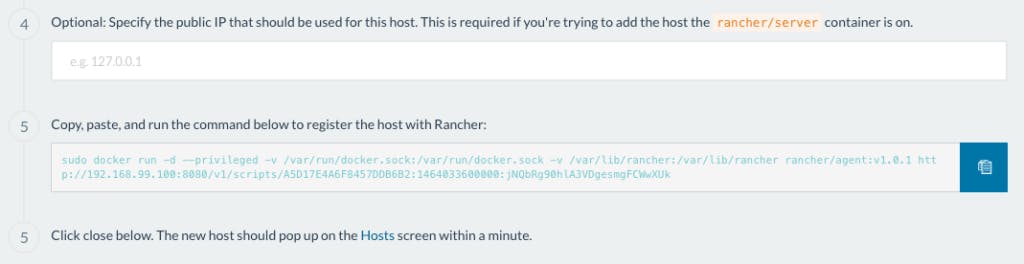
The command for adding the Rancher client is just a docker command. Make sure you connect to the rancher-client Docker daemon first.
Then run the command to start the container (that big string in Step 5 above). After awhile, you should see your new rancher-client server show up in the hosts page.
A big downside of using the docker-machine approach is that if you have to destroy and recreate the environment it is a more manual process than simply running . You need to kill the VMs and recreate them manually and make a note of the IPs that get used, in case they change, along with the customization that needs to happen after provisioning each rancher-server and also the client VMs.
All of these steps could easily be wrapped up into a script to create and configure your Rancher environment but I haven’t had the inkling to do so yet. If you come up with one before I do, feel free to script it and post your script.
BECOME A DEVOPS PRO
FREE DEVOPS COURSE
- Docker Tips and Tricks
- Agile Methodologies
- Documentation and Tools Hacks
- Containerization vs Virtualization