
I have been spending more time using Windows in recent months and as a result, have been exploring PowerShell. It is refreshing to work with a Windows-based scripting language. If you aren’t familiar with PowerShell already, I suggest you check it out. One area that is interesting to explore is PowerShell reporting scripts.
PowerShell is very convenient and flexible, especially for hacking together small scripts and tools. I am not a PowerShell expert, but the good news is that you don’t need to be to get started writing useful scripts. This ease of use is a great selling point for integrating PowerShell in general workflows for scripting and automation in Windows-based systems.
In this post, various PowerShell reporting scripts, tips and techniques are explored to help create a tool that watches a given directory for changes, creates a nice log file which can then be exported as a report to either HTML or CSV and then automatically emailed to a list of users. This use case might be useful for determining when files change or are deleted, for example.
Prerequisites for PowerShell reporting are light; most everything is already set up. It is assumed that PowerShell is already installed on your machine (I am using 5.1) as well as a current version of Windows (7+).
If you are looking for a good text editor I recently discovered vscode and the PowerShell extension, which provides some nice syntax highlighting and code linting.
How to Setup the File System Watcher Script
The first step is to get the file system watcher working so that when files are created/updated/deleted, the information can be recorded. To do this, we will use some PowerShell built-in magic for interacting with the file system. I used this script as an outline for getting things working, but found some functionality lacking, so I modified it. My modified version can be copy/pasted from here.
The script basically takes care of watching a directory for changes, then writing the changes to a log file, so the data can be manipulated later.
To start the file watcher (assuming you named the file Watcher.ps1):
> ./Watcher.ps1 -start
Now if you create a file in the directory specified by the script (Documents), a new log file should appear in the root of the home directory (/Users/). By default, this log will record ALL file system changes in the Documents directory, including changes to files in subdirectories. This behavior can be changed by updating the variable in the Watcher.ps1 script.
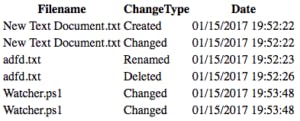
To verify functionality, create a text file, write some data to it, and then delete it. Upon opening the log file (logfile.txt), there should be a record of the recent actions taken.
> New Text Document.txt, Changed, 01/15/2017 19:52:22> adfd.txt, Renamed, 01/15/2017 19:52:23> adfd.txt, Deleted, 01/15/2017 19:52:26
To stop the watcher:
>./Watcher.ps1 -stop
This script is relatively dumb and breaks if the log file is deleted while the watcher is running, so be careful. One other note: this script will only register FS events to the calling shell of the script. If the shell used to call the script is closed, the FS watching will stop, because the watcher now has nowhere to hook into.
Creating PowerShell Reports: Optionally Create CSV Reports
Now that there is data being written, we can start looking at ways to make the functionality more useful.
The code for this PowerShell reporting can be found in this gist. Basically, the script amounts to finding the text file from earlier and converting it to CSV/HTML. It uses existing PowerShell cmdlets to do most of the heavy lifting. PowerShell provides some handy built-in tools for accomplishing this task, including functionality for generating PowerShell reports via the ConvertTo-Html, Import-CSV and Export-CSV cmdlet, as well as the ability to pipe output to text files.
To make things a little bit easier, the logfile is built using a comma to separate the important information to make the conversion to CSV/HTML easier.
> = ", , "> Out-File "C:\Users\:USERNAME\logfile.txt" -Append -InputObject
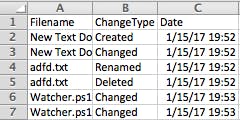
The default output to the log are filename, change type and the date/time. To demonstrate how PowerShell reporting works, run the following command:
>./Report.ps1
This will create two reports in the home directory, report.csv and report.html. The HTML report can be opened with a browser and the CSV with a spreadsheet app like Excel. You can see them below:
Further steps to improve PowerShell reporting might include styling the HTML through the ConvertTo-HTML cmdlet.
How to Create a Scheduled Task to Generate the PowerShell Report
Up until this point, the scripts have been run manually, which works, but isn’t ideal if the process is to be automated. The built-in Windows scheduled tasks are a great way to automate these custom scripts.
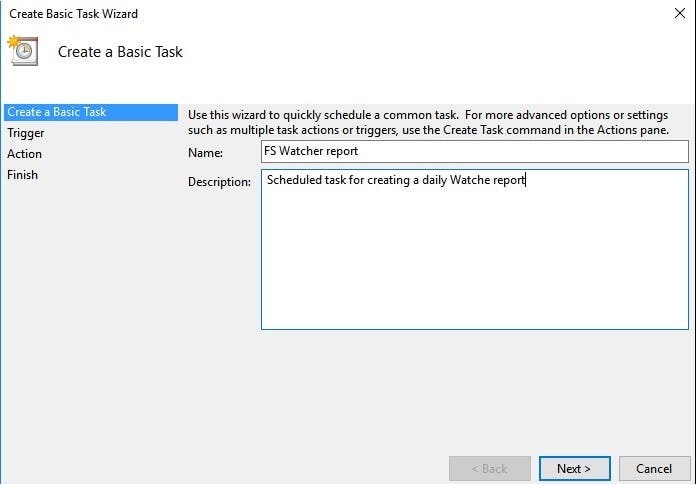
To create a new scheduled task:
1. Pull open the “Task Scheduler” (this can also be done with PS)
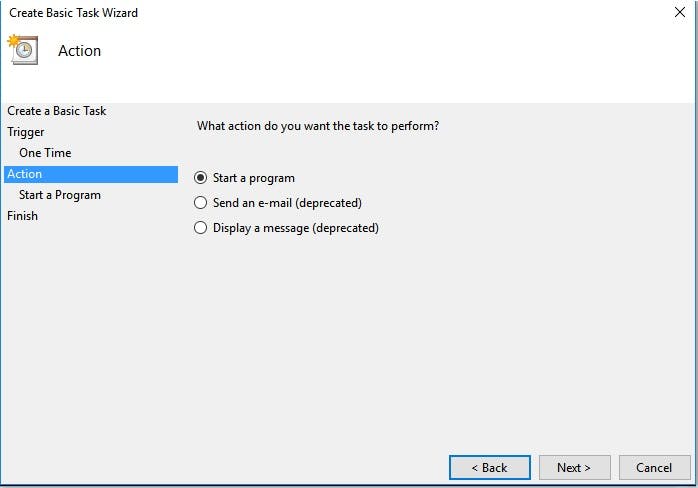
2. Click the “Create Basic Task…” option in the Action panel
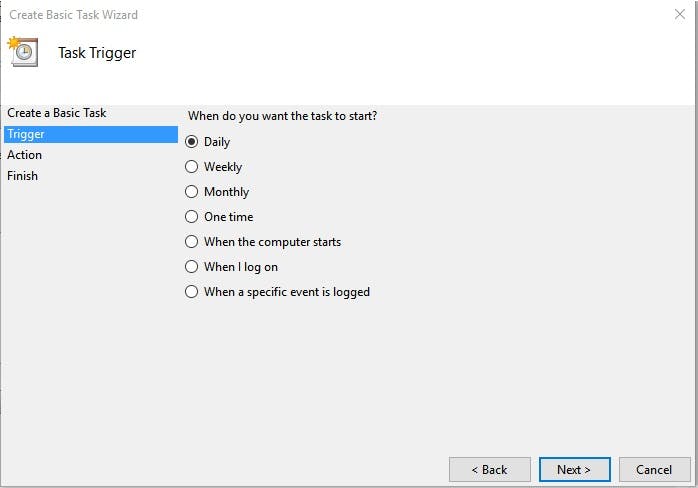
3. Select the option to trigger the task in the screen that follows
4. Select the options that make the most sense and then select an action.
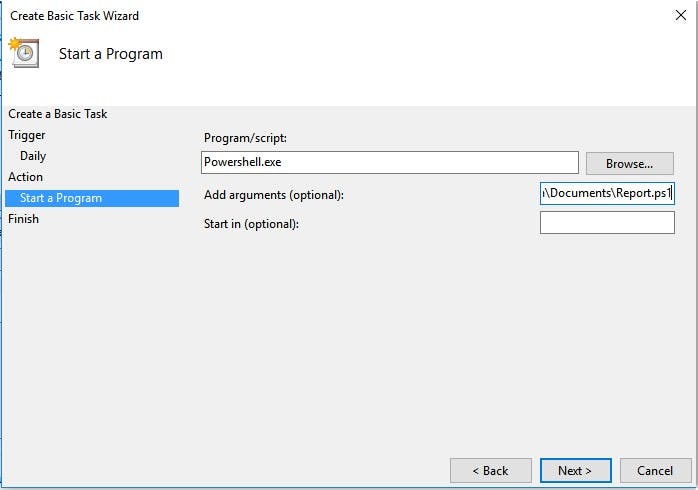
The Program/script should be PowerShell and the arguments should be the Report.ps1 script. You will need the full path to the location of the Report script.
Finish creating the task. When done, click the local task scheduler and scroll through the “Active Tasks” section to locate the task that was just created. Double click the task if there are any options that need to be adjusted.
The scheduled task is now configured to create a new report once per day.
How to Email the PowerShell Report (Optional)
It might be useful to get a weekly report emailed to specific users as a final step to this process. This can easily be done by adding some functionality to the Report.ps1 script since the report script has already been configured to run as a scheduled task. Check the emailReports() function in Report.ps1 for an example of how the email works. Since the email piece depends on individual users and their use cases it will need to be uncommented and modified.
Luckily there are just a few variables that need to be updated to get email reports working correctly. Refer to the Report.ps1 script and update the following variables:
> = ""> = ""> = ""
The command that actually sends the email is simple:
>Send-MailMessage -From -to -Subject > -Credential (Get-Credential) -Attachments
This command uses SSL and requires the user to provide their credentials for the email address that they are sending from. To automate this step, the user would need to hard code their credentials. Otherwise, the command can be configured to hit a local mail server without the -UseSsl flag if the local mail server allows unencrypted emails. Also be sure to update the port if the mail server is configured differently.
Unfortunately, there isn’t a great way around hard coding the password in this script, so if that is an issue, just skip the emails or implement a more secure solution for storing the password on the machine that runs the script.
PowerShell Can Increase Your File Reporting Functionalities
We have demonstrated how easy it is to create some useful tooling with a little bit of PowerShell. This tool is still a bare bones implementation so there is lots of room for improvement. Obviously, this code can be cleaned up, but for small tasks like this, it is just as important to get things working in the shortest amount of time.
A logical next step for augmenting this tool would be to run it on a server that is always watching a shared network folder to keep track of file audits in a fast and cheap way.
It is easy to see how simple it is to take a straightforward task from an idea all the way into an automated tool with little overhead with some PowerShell reporting scripts. This ability to write powerful yet expressive code is one reason that PowerShell is so useful for scripting and is a great reason to get started hacking with it.